Non Stop Knitting
Okay my friends, I agree, I got hooked!
I even bought two knitting books!

Today I was resting, or trying to, when suddenly an urge came to me, I jumped out of bed and rush to the Wool-Thyme store.

I decided to knit my x-mas gifts and put all my good energy on the stitches.
I bought a few beautiful wool ball. I said wool, not acrylic! Why?! Just read this article that I found online and tell me what you think.

“DID YOU KNOW?
Unlike synthetic fibers, wool is fire retardant. Up until recently, the blankets firefighters used to rescue people from burning buildings were made of tightly woven wool. This is because wool will only burn if it is held on a flame and immediately stops burning if the flame is removed. Synthetics only need to be exposed to high heat before they combust (they don’t even need an open flame) and will continue to burn even after being removed from the heat source. This makes synthetics HIGHLY DANGEROUS for infant bedding and clothing (especially if they’re around smokers) because burning synthetics will actually melt right onto skin and continue to burn even after the flame has gone out.
Wool can be stretched up to 1/3 longer than it’s resting length and still snap back into shape!
Wool is a 100% renewable resource that does not require chemicals or consumable energy to produce!
Superwash wool can be machine washed and dried without worry, making it easy care – perfect for infant wear & blankets!
With all the advances in sheep breeds (like Merino and Blue Face Leicester) plus the greater availability of specialty fibers like Alpaca, the days of “scratchy” wool are over!”

Well, and if you were a good boy or girl this year, Santa might get you a knitted hat!

Something That I Made!
I have been exploring new painting mediums and I was invited by a few friends (Lindsey and Tracy) to visit a very talent local artist’s studio (Julie Smith-Davidson) and play with encaustics.
For those who don’t know, encaustic painting is ancient art of using melted beeswax to paint to which colored pigments are added. The liquid/paste is then applied to a surface—usually prepared wood, though canvas and other materials are often used.
The whole place smelled like honey!
I really enjoy it, even though it doesn’t not give me the same control as acrylic paint does.
I specially admired the way I used scrap pieces of wood that have been lying around the house and transformed into something that I can put on my walls.
This first piece I used one of Mr. Sugar’s pictures added to a piece of wood and craved a few words.

The second one was an attempt to create one more of my wedding dress paintings, but this time, using beeswax.


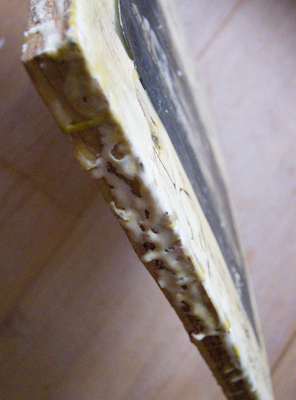
This piece was created on a piece of left over hardwood floor material. I called it Carpe Diem.


This little cubicle house as been sitting inside closet for awhile and finally gave it a project!


Thanks for stopping by…

And The Winner is…
Thank you all for visiting my blog and for taking the time to leave a comment.
All the names are here…


Selected randomly by my little girl…

And the winner is…

…Jennifer from Giggling in The Rain!!!
Congratulations Jennifer, can you please send me a msg with your complete mail address. The apron will be on your way shortly.
Thank you!

Vintage Wooden Spools of Thread
Hello my friends.
I am really sorry for taking so long, but things have been pretty busy on Sugar Land. We are all healthy and happy, thankfully.
However, I still had time to hit the second hand stores and look what I found hidden behind a bunch of bags…


These beautiful wooden spools were all in one bag just waiting for me.
Of course, I couldn’t leave them there!
I collect them…
What do you collect?! I would love to hear.
Hey, Have you left your comment on my Anniversary Giveaway, so please do so, you might win the apron I made with scrap materials. The deadline is October 22nd. Looking forward to seeing you there!

Knitting Mania!
The other day a friend brought me a book called “The Knitting Club” and as I was reading it, I had this urge to learn how to knit.
I asked a my friend Kate to come and help me with a project.
I already knew how to purl and knit and apparently these are pillas of the knitting art.
So Kate, thought me how to read the patterns and I picked my first project.
I knit a hat for my daugther that took me 5 days!
Yeap, It really did, BUT after that, I went to the wool store in town and got this beautiful pattern for a cozy hat, which I already made two of them and I am working on the third. They are quick, easy and really look nice.
Here is pattern:


Cut yarn leaving a 12″ tail. Draw through rem stitches and pull to close. Using the tail, sew side seam. Weave in all ends.

Dinner Club
Have I told you about my kitchen phobia? When I could not stand reading a cooking recipe book without freaking out every time the recipe called for “put aside”?
Well, a year and a half ago I decided to face the lion.
I invited 10 of my girl friends to be part of a dinner club.
The rules are:
– every month a different person hosts the dinner and provides a thoughtful four course meal.
– the guests bring the drinks lots of laughter and help preparing the feast.
I didn’t really think that we would be able to keep up with the club, however, for my surprise, it is still going and the number of members varies, but we always can count on a very special meal, at least once a month.
We are now called – The Ladies of The Night (thanks to Jacob!)
The table decorations are beautiful, look at this one from the last dinner! Good job Tove!

Are you member of any club? Books, swaps…?! I would love to hear about it!

Last Harvest!
It was an exciting year for my vegetable garden.
Mr. Sugar built the amazing beds, I got to try new ways of planting food, some didn’t turn out at all and some did splendid well!
I am still wondering what kind of animal would snap all my zuchinni flowers. Well, no zuchinnis or cucumbers this year!
On the other side, we had a bunch of greens, herbs, carrots and tomatoes (red, yellow, orange, chocolate). Amazing stuff!
Thanks Mother Earth!
And, of course, a huge load of hot pepper because Mr. Sugar’s nick name is HOT PEPPER MAN!!!
Hey, I forgot! Don’t miss the chance to take home one of my aprons, leave a message at the Anniversary Giveaway post so you have the chance to win! I will send it to the winner anywhere on the globe! How about that?!
Have a great week!


Anniversary Giveaway!!!
Six months have passed and I am still here! Yipieeee! Thanks to YOU, who connects to me, who posts me comments, who reads my blog…
So in return to this awesome friendship, I would like to giveaway one of my handmade aprons.
To win, the only thing you have to do is to post a comment bellow. However, if you would like to have a double chance, share this with your Facebook friends or on your blog and let me know here.
Entries valid until October 22nd. The winner will be randomly chosen on October 23nd 2010.
Good luck and thank you!


Dead People Stuff
What a great name for an antique store! Don’t you think?! We were driving by Blooming field, close to Picton, when I spotted the sign.
On the back of an old house, a barn full of vintages and dead people stuff.
A very friendly place with an amazing assortment.
Here some pictures of our discovery…


Yard Sale and Thrift Finds
Saturday morning, my favorite day of the week, time to go for yard sale hunt.
It is a tradition in our family and since we already hit too many stores and yard sales in town, today we decided to invest some time in our neighbour’s cities.
We started with Picton, beautiful drive from Kingston and such amazing places to see.
Mr. Sugar said he spotted an interesting antique store on the way back from the dunes the other day, so we decided to go check it out! Here it is…

Peach collection…

One of my favorites…

some of them are from the 80’s, are they vintage already?! Gosh, I am getting old…


The Gentle Art of Domesticity
I would like to introduce to you an exciting concept and way of living.
A few of us practice it every day…
I am talking about the art of knittting, crochet, baking, stiching, quilting, gardening, homemaking, etc.
And a few of us name the activity of being a house wife, a domestic wife, a home maker and so on.
These are all fine concepts. However, in our society can, some times, be a little bit twisted.
So let’s rename it!

We are, from now on, Artists of Domesticity
Yeah! Great Babi! But…it is still the same…
No, it is not!
I could not try to explain better than Jane Brocket in her book The Gentle Art of Domesticity. So she explains that there is a whole world of difference between domesticity and domestication.
The artists of domesticity find pleasure and joy of the gentle domestic art of knitting, sewing, painting, cooking and etc.
Their passion is not expressed by repetite and endless rounds of cleaning, washing, ironing, shopping, house maintenance that comes with domestication.
“Domesticity rises above the bosiness of cleaning products and media exhortations to keep our houses pristine and hygienic, and focuses instead on creativity within the domestic space.
Domesticity give us the opportunity to express ourselves, and the gentle arts are the most satisfying and achievable means of doing so. Domesticity frees our minds and hands and eyes to enjoy often neglected and undervalued skills, textiles, color, textures, patterns and comforts, all of which can bring pleasure to both the domestic artist and those around her.”
So, my dear friends, this new interpretation made me feel better about the everyday tasks, they are necessary but don’t need to be a brutal.
Hey, if you think further…
shouldn’t we be getting paid for that?!
Hummmm, I think this is another story…

My First Waldorf Doll
When I was pregnant with my son Dante, I started making a Waldorf Doll with a few other mothers.
In the beginning was very engaged, but as we moved towards the construction of the actual body, hair and etc. I let my project on the side.
Later, talking to a friend of mine, who was trained in Antroposophy and Waldorf Teaching, she pointed out that the construction of a Waldorf Doll involves more than a simple act of putting pieces together, it is a spiritual journey, where each step will show you the way a person deals with things in life!
Holy C.! And I put my doll aside?!
I always thought of myself of being a non-procrastinator or non-resistance person, but I guess I still had a bit of it inside me.
I wanted to finish the doll, but never got to it.
As I finished our conversation, I searched for my doll pieces and got to work. I promised only to stop when I had done her.
Ladies and Gentlemen, I present to you, Anne!

My first Waldorf Doll and the representation of my resistance and procrastination, which will not be around anymore, because I accomplished something!
I love the way she tilts her head to the side!

She needs some special clothes and I am looking for a good source of it! If you know of any, please let me know.


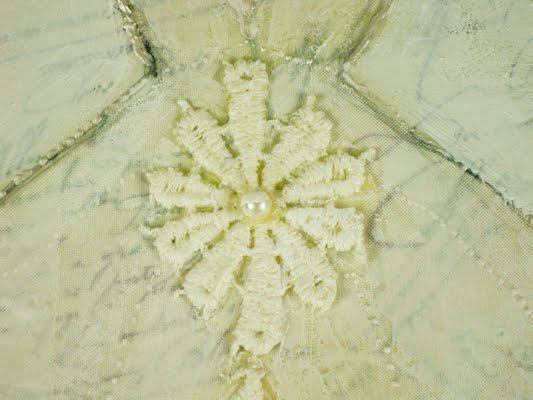
Post Card Weddding Dress
The following dress was mounted on top of a few vintage post cards, layers of acrylic medium added, laces and fabric on cradled wood panel (12″ x 12″).
The challenge here was to make the post cards show through the dress and still permitting it to stand out of the back ground.
I have been learning a lot from Rheni Tauchid’s book (The New Acrylics), and if you are looking for a good source of acrylic medium uses explanation. This is your book!
I am getting there…until then..I keep making my dresses…


How to Draw Animals like Picasso!
I recently discovered a very interesting book, for mixed media artists – Drawing Lab by Carla Sonheim.
I always had a hard time with drawings and letting the picture happens other then actually force it.
Carla gives in her book 52 creative exercises that helps you to have fun when drawing.
One of my favorites is the Picasso Dogs.
Here are the instructions for this exercise, with Carla permission, of course:
1- With a fine-point permanent marker, draw an eye anywhere on the paper. Turn the paper 90 degrees clockwise.

2 – Draw a second diferent eye, several times larger than the first eye. Turn the paper 90 degrees clockwise.
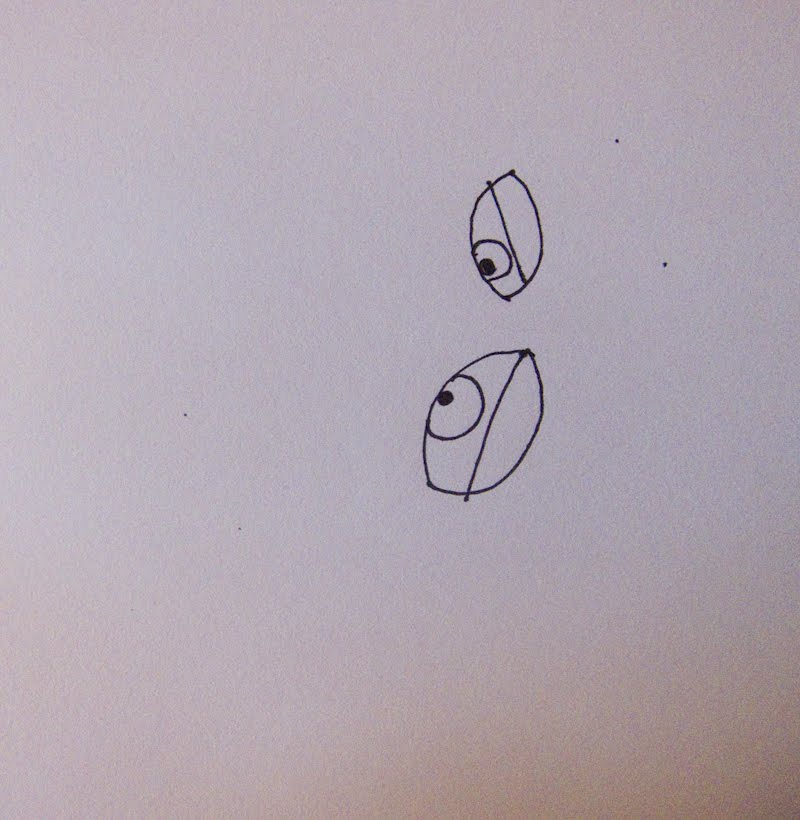
3- Draw a nose or snout. Turn the paper 90 degrees clockwise.

4- Draw a leg or a paw. Turn the paper 90 degrees clockwise.

5- Draw a tail. Turn the paper 90 degrees clockwise.

6- Connect the elements together with straight and curved lines. Don’t wory to much at this stage; just connect the pieces together and stop when it feels right.

7- Finish with markers and colored pencils.

A the end my dogs didn’t look like dogs, but I like them!


Chinese Wedding Dress
Dear friends,
I am really sorry about loading you with all these wedding dresses. I just can’t stop.
When I was a child and locked myself in my bedroom with a set of colored pencils, I would always end up drawing of a princess with a luxurious gown, adorned with pearls, precious stones, shiny fabrics, etc.
Well regressions occur, sometimes, in people’s lives.
I think is my turn now.
How about a elegant and plain dress with very few lines to celebrate a chinese wedding.
Mixed media on cradled wooden panel (12″ x 12″), fabric, lace and acrylic paint.


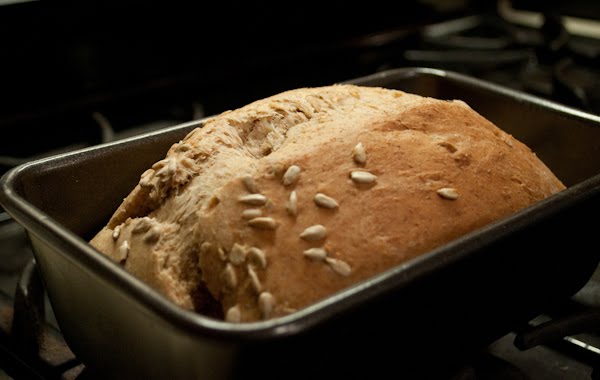
Making Bread With Children
I have been a big fan of introducing all kinds of “home” activities to kids.
I think mostly because I came from a home where my mom delegated big part of this art to others and I hardly ever had my hands on it!
My biggest discovery was the pleasure of making bread from scratch. I never thought it would be that easy.
At first, I started making it by myself as I wasn’t really sure how it would turn out.
After a few weeks of working with bread almost every second day I made two loaves with them.


It was so exciting, there is nothing like making a loaf of bread from scratch and unlike a quick bread, a bread made with yeast is so much more satisfying.

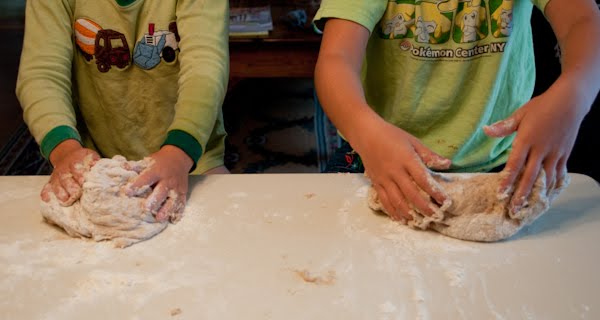
It’s worth every minute. It’s extremely gratifying to mold and knead with your bare hands. It’s a very basic, earth connecting experience!
The suspense is exhilarating, waiting to see if the dough will rise.

Then the best, or almost the best part is the aroma.
There is absolutely nothing that smells better from the oven than fresh baked bread. The smell can linger for days. Nothing says “home” like the fragrance of freshly baked bread.
Of course, biting into a piece of warm bread with butter melting on it, isn’t too bad either.
The following recipe is the one I usually make with my children, we substitute sugar for honey and they love the taste.
In a separate container:
1/2 cup of warm water
1 tsp of honey
2 tbsp of yeast
In a bowl:
1 1/2 cup of water
1/3 cup of honey
1/3 of oil
1 tsp of salt
Add with yeast
3 cups of whole spelt
3 cups of light spelt
Knead for 10 minutes and let if rise for approximately 45 minutes.
Separate the loaves, knead a little bit more, prepare a pan with a bit of oil so the bread will not stick, let it sit for 15 minutes and put in the oven
This recipe makes 2 loaves
Bake in a pre-heated oven (350C)
special tip: Add one cup of flour (you will be left with 5 cups of flour) in the bowl before you add the yeast just so the salt does not get in direct contact and does not alter the yeast property.
We also add nuts, dried fruits or seeds at the end, as we do the final kneading.

Inspiration Board – Finally Done!
I finished it! I took me only one hour.
The whole process is very simple. It is just a matter of having the material available.
I had the canvas sitting behind my door and looking for a project.
The fabric, I salvaged from a thrift store. I actually bought thinking on using it for x-mas, but now it is just a piece of fabric.
The lace a had from previous yard sales finds.

The pieces I added to the board are things that I handle everyday and for some reason give me a very good vibe.
The beautiful lady is my grandmother, she was such an elegant woman with a beautiful voice. I like to think she is somewhere singing and happy!


Pearls, baby-hats, laces, buttons, hearts…a lot of inspiration there!
I want to see yours, please send me the links.


Vintage Photos Source
I am really sorry for taking so long, I thought that going on vacations with the family and manage keeping up with my blog would be easier, but I guess I was wrong.
Mr. Sugar forwarded me an amazing source for vintage pictures that I believe, but not 100% sure, it has no copyrights.
They are more than 100 years old pictures and were uploaded in high resolution.
So, grab you coffee and search through these beauties!
http://www.shorpy.com/
See you soon…


Inspiration Board
Where do we find inspiration to make art?!
Maybe from poetry, from an internal calling, mementos, photos, objects, magazines cut outs, movies, from other artistic expressions, and the list goes on and on.
The thruth is – inspiration is EVERYWHERE!
It can be a bunch of buttons inside a jar,

a pile of wooden discs,

a basket full of laces,

or a moment when a candle is lit on that special corner of your home.

Surrounding us there is the whole world filled with little bits of inspiration, switching them on is up to us.
I have a strong tactile and smell sensor. I need to be touching and smelling things in order to activate my artistc sensors, so I decided I need to built an inspiration board!
Here is a little tip on how to start your own:
1 – Use a normal canvas or a flat board for surface. Cover your board with a piece of fabric that suits you, paint or paper. Create a unique background to built on.
2 – Start collecting small items that catch your eye. Whether it’s a photo from a magazine, a piece of ribbon or the packaging from a soup can, anything that you find visually appealing can go on the inspiration board (in my case a would add a piece of lavender too)
3 – Attach the small items with tacks, tape or glue, and watch your inspiration board take shape.
Start collecting small items that catch your eye. Whether it’s a photo from a magazine, a piece of ribbon or the packaging from a soup can, anything that you find visually appealing can go on the inspiration board.
Attach the small items with tacks, tape or glue.
Watch your inspiration board take shape

Soulmates
One day, I was listening to one of Wayne Dyer’s workshops and one of his patients, told him that she was totally in love and her boy friend was her soulmate.
Dyer asked her how did she knew that for sure and she answered him, that her boy friend was perfect, their relationship was heavenly. He calls her every day, they drink coffee the same way and finish each others sentences all the time!
Great! He said, you just described your best friend to me!
I was puzzled when I heard that!
Then he explains, that the best friend would not be her soulmate.
Soulmates are the ones that push your buttons!
“WHAT?!” – I thought.
He continues, saying that soulmates were the ones that make you go unusual ways, make you see life in different perspectives, make you use the best out of you, push your buttons to a point that some times you think that is the end and then, the best part…
…when you look back in your life, you see that you are a better person, you grew as a human being, your partner is also a better person and your relationship grew together with both of you!
So, next time you are feeling sad, look back in your life and reflect on how much you grew!
I could use many more posts, just to give you my examples but, for now, I just want to leave you with the same feeling Wayner Dyer left me – “Wow! It worthed every single moment! Mr. Sugar, I LOVE YOU!”

PS – The previous statement is my interpretation of Mr. Dyer’s workshop. I do not remember which one specifically, however they are all very good, so explore them all and you will find this episode there!
